Scrambler 1200 Blog: Pannier Support Arm Fabrication
- visualizethis
- Sep 11, 2022
- 4 min read
Welcome to this mini instructable about the support arm I fabricated to strengthen the mounting frame for my Triumph Scrambler 1200 one-sided pannier frame. I call this a "mini" instructable because I skip the details of cutting, welding, surface preparation, and painting. Instead, I emphasize the problem, the solution, and show the final support arm with images of me installing it.
The Problem
This particular Triumph pannier system is perfect for my daily commutes as it is essentially a dry bag incorporated with a quick release mount to a semi-permanent mounting frame. This makes it easy to carry my work laptop, lunch, and rain gear. It's plenty durable for street use, but I bought this motorcycle for off-road use too. The way the pannier is mounted is by a two-point mount to the rear tail section. What it lacks is the rigidity of a three-point mount system like those that come on most sport touring machines (i.e. FJR1300, ST1300, K1600, C14, and many more). It hangs from the tail subsection via two bolts and will easily bend inwards colliding with the left rear shock if the bike crashes on that side.
The Solution
To ruggedize the Triumph mounting frame I wanted to somehow tie the frame to the rear foot peg mount. This would provide a triangulated support structure that would make the system more tolerant of the jarring and spills that come with the realm of trail riding.
Some of the key design elements I took into consideration:
Simple form, simple parts, use existing tools, fast build.
The support arm should not be so strong that in case of a crash it ends up bending the more costly structures it is mounted too (i.e. tail section frame). So building into the arm some form of stress relief area was important.
The support arm should be a bolt-on item and not welded to the Triumph frame. The Triumph frame is stainless steel and I do not have experience welding stainless and did not want to invest in the appropriate gas, wire, and time in training for such a small job.
Use two-piece shaft collars of 11/16" inside diameter to provide bolt-on attachment points. Two of these oriented along the bottom horizontal tube of the Triumph frame with each of their halves welded to the new support arm.
Support arm material: 3/4" round tubing with 1/16" wall thickness.
Weld a flat section to the other end of the support arm that will mount between foot peg and its base.
Minimize the number of bends in the tubing, because once again I don't want to invest in a tube bender for this simple job. Yikes! They are pricey.
Media blast with crushed glass, zinc phosphate coat, and paint satin black.
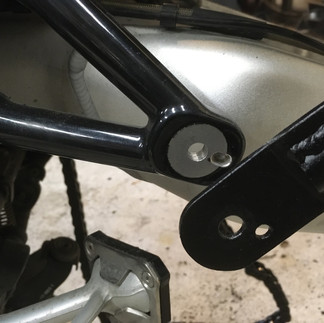
The following 3 images show the arm with the 2 piece split collar mounts. I sourced these 11/16" split collars online from McMASTER-CARR. Reliefs were cut into the 3/4" tube to fit the collar halves and I then MIG welded them in place. The 3rd image shows the assembly bolted to the Triumph pannier frame.


I used a 1/8" inch thick length of 1 1/2" flat mild steel to make the mounting tab for the rear foot peg. At 1/8" thick this material would serve as the relief point that would save the motorcycle's foot peg frame from bending in the event of a crash. I cut a slot in the tube using a high speed cut off disk to fit the flat for fillet welding (see the first of the next 3 images). The second image below shows the locating hole I needed to transfer to the new mount tab for locking the position of the foot peg. The third image shows the support arm and foot peg assembled.


The following image shows the final assembly. The split collar mounts fit snuggly without need for shimming, and the fact that there are two of them spread along the length of the frame tube, essentially makes the support arm one with the frame. Only two bends were needed to align the support arm between mounting points. One bend was made in the tubing forward enough to clear the suspension spring. The second bend was made in the mount tab to get it on the same plane as the foot peg mount surface. I bent the tubing using my MAP/Oxygen torch to allow stretching the tubing's outer radius to prevent kinking.


My Final Comments
For sake of not going overtime on this project, I decided not to get fancy by adding closures to the ends of the support arm. Closures would be practical to keep moisture out and would look more professional. To deal with potential inside rust I used a frame paint sprayed on the inside.
I was tempted to purchase a respectable tube bending tool, but quickly found this to be an expensive proposition. I'll wait for a bigger job and need before committing to one of these. Note: Tube benders are not the same as pipe benders. One way they differ is in how they specify the diameter of tube/pipe they are designed for. Tube benders use outside diameter while pipe benders use inside diameter.
I had considered fabricating a second support arm that would tie the frame to the right side of the tail section. Dual pannier mount frames typically cross tie to each side, so this second arm would emulate that and provide additional support. I scrapped this idea since I believed the single arm to be sufficient for the relatively light weight contents I would be packing into this pannier bag. For trail use I'd would only pack my sleeping bag, clothing, and toiletry bag. Heavier items such as tool kit and tent would straddle the seat and back rack.
Bending the tube and mount tab were performed by trial and error fitting. Bend and check, bend again and check, etc.
Project time was about a half day for thinking, cutting, drilling, grinding, bending, fitting, welding, and media blasting. It took another couple days to zinc-phosphate coat, paint, and dry.
Comentários